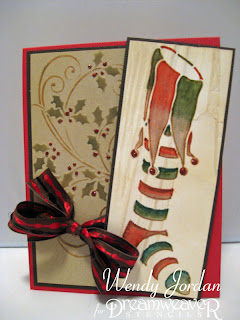
It's Dream Team Thursday already. Thursday's are the one day of the week that the Dreamweaver Stencils Design Team post their challenge creations for the current month. This month our challenge is to GET INKY, which is really easy for me!!!
I recently bought the entire set of Tim Holtz Distress Markers. They sat there and sat there, until the other day I thought I should watch one of Tim's video's and use these guys.
One white cardstock, I laid down the Long Stocking Stencil (LL499) and adhered it temporarily with removable tape. I drew around the outline of the stencil with a Sepia Copic Multiliner and started coloring with the markers. I chose Peeled Paint, Pine Needles, Barn Door, Fired Brick, Antique Linen, Old Paper and of course the water brush. I started coloring with my darkest color to my lightest color in each area and when over all the color with the fine tipped water pen.
As you can see, the panel with the focal image looks a bit "distressed". This is wasn't intentional. As I was embossing the background panel, my beautifully colored focal image got stuck to the bottom of my Big Shot and when the platform came out of the machine, so did my crinkled image, BUT I wanted this to be a "distressed" card, I mean I am using Distress Markers after all. I flattened the panel as best as I could, added Antique Linen Distress Ink to the edges and rolled with it. I think it turned out great.
As I started to tell you in the previous paragraph, the background panel was dry embossed with the Holly Flourish (LG731) stencil. I dry embossed the paper with the Big Shot. Here is how I layered my "sandwich" to achieve the dry embossing: Big Shot Multi Purpose Platform base (first two tabs removed), stencil, card stock (with a few spritzes of rubbing alcohol on the back), rubber embossing mat ( I used Stamping Details Rubber Mat from Dreamweaver Stencils) and two acrylic plates. That is the recipe to perfect dry embossed stencil images every time.
Once the dry embossing was complete, I placed the Holly Flourish stencil over the embossed image again and added color with a stenciling brush and VersaMagic Gingerbread and Hint of Pesto chalk inks. The holly berries and tassels on the stocking are Fired Brick Distress Stickles.
I hope you enjoyed my little step by step. I hope you have a chance to "Get Inky" this month with Dreamweaver Stencils. Share your original creation with us at the Dream It Up blog. You can link your projects there for your chance to win one of two prizes that Dreamweaver gives away to challenge participants each month.
Ready for more "INKY" inspiration? Check out this group of talented ladies....
Have a great day!!!


5 comments:
very very very cool! Love the look!
Wendy, you are truly one of my go-to girls for inspiration and today's card just affirms that for me!
I love it when mistakes work! The first thing I noticed was the background of the stocking and wondered how you had done it because I LOVE it! Your colors are wonderful, great card!
Very lovely card! I like the colors of the distress pens too. The way you outlined the design first really adds to the final outcome of the feel.
This is beautiful. I love the distressed look and the colors you chose. Thank you for your detailed description of how you made your card.
Post a Comment