Monday, January 28, 2013

Thank You Heather Engebretson, Owner of Skipping Stones Designs Stamps

Thank You Heather for allowing me to design with your fabulous stamps for two years.   I love seeing your new creations and can't wait for your return!!!

I was lucky enough to design for Skipping Stones Designs and was able to lead the Design Team for a few months of that time.

Some past and present SSD Designers have put together a hop for Heather.  If you just came from Rochelle's blog, you're in the right place.

If you just happened along my blog today, you can start this hop back at the beginning to see all of the SSD eye candy.


Katie Gehring  <----having a="" giveaway="" p="">
Wendy Jordan ( You're Here)

 I made  a Thank You card today using my favorite Skipping Stones Designs set, Heartsong.  This set was release in 2011 and was a huge hit.  I wouldn't be surprised of other designers have used this set today.


Be sure to keep in hoppin' and hop over to Karen's blog.  She always has fabulous projects to dazzle!!!

Be sure to leave comments along the Blog Hop.  A few of the designers have free SSD sets to give away!!


Pin It

Thursday, January 24, 2013

Dreamweaver Stencils Fresh Start January Challeng

Welcome to Dreamweaver Stencils January Challenge!  This month our challenge is a Fresh Start.  A perfect challenge to start the New Year.

In the past three weeks, I have been creating greeting cards with the same stencils and demonstrating different techniques highlighting the beauty of the stencils.  You can read those posts by choosing the links below...


As far as today's post, I have bad news to share.  LJ 849, my beloved Bare Trees stencil had created its final card last week and gone to stencil Heaven.  This week while gathering supplies for my post, Bare Trees took a spill, just as I was rolling my studio chair and a wheel rolled over the top of the stencil, with irreparable damage. 

 So, continuing with the tree theme, I went back to the basics of my January 3rd post with simple dry embossing, using a newly released LX7020, Leafless Tree.  


LS90 Celebrate Script, made it through the fall and I was able to continue with this sentiment that has been the basis of my January challenge, Fresh Start.

My card today blends together two techniques, Dry Embossing with a die cut machine and the Double Glitter technique.

LX7020 was dry embossed with a die cut machine, and while the stencil was still in place, I applied a glue pad to the "raised" or embossed area.  I removed the stencil and sprinkled a micro fine transparent glitter over the top of that.  The sentiment was created using the Double Glitter technique.  To view a short video on Dreamweaver Double Glitter Technique, please view my video here...


Please join my Dreamweaver Stencils Design Sisters in out January Challenge.  You can see how they are being challenged today on their blogs...


Have a great day!

Pin It

Thursday, January 17, 2013

Dreamweaver Stencils Fresh Start January Challenge

Welcome to Dreamweaver Stencils Fresh Start January Challenge.

This month I have decided to take a different approach to our Dream Team Thursday posts.  I have been using the same stencils all month long, with different techniques.  The first post of the month was a simple dry embossing technique, the second post was adding color to a dry embossed image.  If you're interested in reading the first two posts.  Follow the links below:


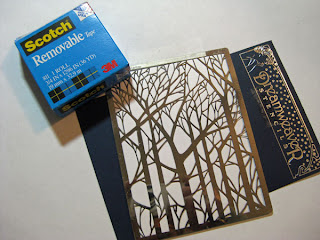
Today I am using the Dreamweaver Bare Trees (LJ849) Stencil and Celebrate Script (LS90) stencil, with Color Solutions Alcohol Inks from Dreamweaver Stencils.  The colors shown are Black Beauty, Iceburg and Color Solutions Thinner/Cleaner.


Start by securing your stencil and glossy card stock to your workspace.   You also see a Mini Mister in this photo.  I am not going to apply ink in the traditional way with a felt applicator.


I place a few drops of Color Solutions Thinner/Cleaner in the Mini Mister and added a few drops of Black Beauty to the mister with the Thinner/Cleaner.  
Color Solutions Inks bright, vibrant "artist grade" color, that can be decreased with with Color Solutions thinner.  


Adding Black Beauty to the thinner, will give me a gray color.  I added a few squirts to my project.  There wasn't very much in the mister, so I just used it all.

I repeated the above steps with Iceburg Color Solutions ink and spritzed the top of the tree's.


I wasn't satisfied with leaving the background with out shimmer.  I applied Pearl White Color Solutions Ink with a felt applicator, while the stencil was still in place.  You can see it here.

I added ink to the Celebrate Script Stencil also with Black Beauty and Pearl White Color Solutions Ink with a felt applicator also.


I love the distressed end result and I hope you like it well enough to get out your stencils and inks and give our January Fresh Start challenge a try.

Please join my Dreamweaver Stencils Design Sisters in out January Challenge.  You can see how they are being challenged today on their blogs...


Have a great day!


Pin It

Friday, January 11, 2013

Stampendous January Kiddo Challenge

Good morning!!

The entire month of Janaury, Stampendous and I are celebrating KIDDO's!!!  What a happy day early last year when Stampendous introduced the kiddo line!!!  If you haven't take a look at all the cuteness...HERE YOU GO, follow this link.


I used the Cling Wagon Kiddo for this fun card that I used in as a class sample earlier this summer.  It is a great stamp to for students learning to color a scene.

The Stampendous’ Kiddos Collection of adorable children has really grown in 2012 and there are new additions to the family in store for 2013. These little kids are so cute and are doing those things kiddos all over the world love to do. They’re perfect for children’s birthday cards, party invites, scrapbook pages, and even a whole class full of Valentines! Our kiddos do it all. Let’s see what you can do with them! Stamp your favorite Stampendous Kiddos on any type of project and link it to the linky tool below for your chance to win a Kiddo of your own! (yes...you can use other cute kid stamps you already own, but Stampendous Kiddos on your project make it count twice!)(and yes, winners still need a U.S. Mailing address)


Pin It

Thursday, January 10, 2013

Dreamweaver Stencils January Fresh Start Challenge!

Welcome to Dream Team Thursday!!

Dreamweaver Stencils January Challenge is Fresh Start and you can use this challenge to express what a Fresh Start is too you.

Last week, in my Fresh Start challenge post, I posted a card design, that is a true Fresh Start with stenciling.  I dry embossed cardstock with a  stencil and a die cut machine.   In the post, I told you I was going to build on the challenge each week adding a new technique as the month progressed.

To read last week's post and see the Fresh Start creation, follow this link.

In last week's post, I showed how a simply embossed image can be so pretty.  This week, I am starting with the simple embossed image and sharing two easy ways to add color.


The supplies that I used to achieve the color's are Versafine Watermark Embossing Ink, Bare Trees (LJ849) Stencil, colored blending chalks.


I started by placing my clean, dry stencil over the top of the embossed image.  I secured the stencil and paper on all four sides with Removable tape.


 With the stencil in place, to protect the areas that I wouldn't like chalk, I applied Versamark Watermark Embossing Ink.  This ink will act as the"glue" that holds the chalk in place.

 I added each color with my fingertip as the applicator.  Be careful not to push to hard and your color will only stick where your Versamark Ink is.


Complete.  The design is still simple, just more to look at.

The next design is the same stencil, same dry embossing technique, just a different color application (and a reason to get that Copic Air Brush Machine off the shelf).


Choose a few colors from your Copic or whichever marker you can use in your airbrush.  The colors do not need to be in the same color family.  I chose B32, B47, B99.


Apply a layer of your lightest color all over the image.


 Jump to your darkest color and start at the bottom, where the sky would be darkest.  Continuing to add lighter colors as you work to the top of your panel.


Remove your stencil and you will find this!!  You can't see it in the picture, but this is where you will find that it is important your stencil is taped down on all four sides.  This particular stencil, at my own fault, is slightly bent in the center and while airbrushing, a bit of blue got underneath the stencil.    I still think the color gradient turned out stunning.


The Celebrate stencil was colored in the same way as the background.
I hope you enjoyed this easy way to add color to your embossed image. 

Next week, I  will continue my series with these two stencils and techniques associated with dry embossing.

Ready for more inspiration, please check out the rest of the Dream Team...

Cherylynn Moser
Cyndy Bundy
Georgia Sommers
Kristi Van Doren
Laura Drahozal
Lee Kellogg
Liz Martin
Lousie Healy
Lynell Harlow-Dream It Up
Pam Hornschu
Terrece Siddoway

Have a great DAY!!!

Supplies:
Stencils: Bare Trees (LJ849), Celebrate Script (LS90) Dreamweaver Stencils
Color Mediums: Copic Markers (Imagination International), Blending Chalk (Inkadinkado)
Ink: Versamark Watermark Ink (Tsukineko)
Extras: brads, ribbon (Creative Impressions)

Pin It

Friday, January 4, 2013

Stampendous January Sweet Kiddo Challenge

Welcome to Stampendous' January Challenge.  This month we are challenging you to create with your Stampendous Kiddo Stamps!!  The Stampendous Kiddo Collection has grown so much and EVERY SINGLE stamp is DARLING!!!

Today I colored a Kissin' Kiddos (CRQ165) with Spectrum Noir markers. 


Kissin' Kiddo's is perfect for a Valentine image for your Husband, you own Kiddo or just cute for a really good friend.  This stamp would also be a nice gift for a friend or "kiddo" that loves to stamp or color.

Card Recipe:
Stamps: Cling Kissin' Kiddos (Stampendous)
Paper: Bazzill Basics
Ink: Memento Tuxedo Black (Tsukineko), Spectrum Noir Alcohol Ink Markers-FS2, FS3, EB1, BG2, BG4, PP4, PP6, BP3, BP5, LG3, LG5, TN1, TN3, TN5 (Crafter's Companion)
Die Cut: Heart/Lace Doily (Silhouette America); Lacey Circle (Spellbinders)
Extras: ribbon/lace (Michaels); Petal Pink & Silver Pearl Liquid Pearls (Ranger Industries)

Stampendous’ Kiddos Collection of adorable children has really grown in 2012 and there are new additions to the family in store for 2013. These little kids are so cute and are doing those things kiddos all over the world love to do. They’re perfect for children’s birthday cards, party invites, scrapbook pages, and even a whole class full of Valentines! Our kiddos do it all. Let’s see what you can do with them! Stamp your favorite Stampendous Kiddos on any type of project and link it to the linky tool below for your chance to win a Kiddo of your own! (yes...you can use other cute kid stamps you already own, but Stampendous Kiddos on your project make it count twice!)(and yes, winners still need a U.S. Mailing address)

We'd love for you to visit the Stampendous Impression's Blog for more Kiddo Inspiration.


Pin It

Thursday, January 3, 2013

Happy New Year!!!! Dreamweaver Stencils Dream Team Thursday

Happy 2013!!  I hope you had a fabulous Holiday Season, filled with Family and Friends!!

What are you resolutions in 2013!!  I hope you have room on your list for Dreamweaver Stencil monthly Challenges.

January has a great challenge, that leaves a lot open to the imagination.  The challenge is a Fresh Start.  The perfect challenge for this time of year.  We are challenging  you to create with a new baby, new job, a resolution.  Anything that is a  fresh start for you, even if this is your first time creating with Dreamweaver Stencils, that is a fresh (and HAPPY) start.

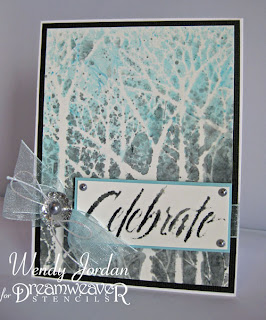
The card I created today is a Fresh Start with three "Fresh" meanings behind it.  The stencil that I have chosen to create with this month is my FAVORITE of all time and I used it today in a very Clean and Simple Way.  The second "Fresh" is that this is post one of four in how we can take this stencil, from this simple technique and each Thursday of January, I am going to progress the technique to make this stencil a WOWZer of a card (WOWZER being my opinion, haha).

For the third part of my Fresh Start, nothing is more beautiful than waking up in the morning to fresh fallen snow, undisturbed, cold and sparkly (if the sun is shining just right).  Today  my card reminds me of those mornings.

The sentiment "Celebrate" is how I feel for this coming year.  I am so excited to see where my life takes in me in 2013.  I have a feeling that I am going to have something to "celebrate" this year.  I can't wait!!


I dry embossed the Bare Tree's Stencil (LJ849) and Celebrate Script (LS90) with The Big Shot and simply added a bit of ink around the edges of the card base and sentiment panel.

Supplies Used:
Stencils: Bare Trees (LJ849), Celebrate Script (LS90) (Dreamweaver Stencils)
Ink: Tumbled Glass Distress (Ranger)
Ribbon: Bazzill Basics,
Pin: Maya Road

All of my fellow Dream Team Sisters are sharing their Fresh Start this week.  Please take a few minutes to see what they are up to...

Cherylynn Moser
Cyndi Bundy
Georgia Somers
Kristi Van Doren
Laura Drahozal
Lee Kellogg
Liz Martin
Louise Healy
Lynell Harlow - Dream It Up
Pam Hornschu
Terrece Siddoway

A big HAPPY BIRTHDAY to Lynell Harlow tomorrow!!!  When you're on her blog today or tomorrow, please wish her a Happy Birthday!!!


Pin It