Monday, October 29, 2012

Paper Craft Planet Monday Tutorial - Burnished Velvet Technique

Good morning!!  Today I have the Monday tutorial on Paper Craft Planet!!!  I  made a video tutorial using paper border punches and GLITTER!!!

I created this pretty card for a class I taught at a retreat recently, so I thought I would create a step-by-step video tutorial.
 

 Using a border punch, I created the snowflake in the center of the die.

Here is the step by step video.  Excuse the stumbles in my speech.  I made this video at like four o'clock in the morning!!  Haha!


Supplies Used:

Paper: Marshmellow, Gumdrop Card Shoppe Cardstock (Bazzill Basics Paper) *psst....LOVE this card stock, the best out there*, Double Sided Adhesive Sheets (Be Creative)

Dies: Heirloom Ornament Nesting Dies (Spellbinders), border punch (Martha Stewart)

Glitter: Liberty Blue, Silver Microfine Glitter (Glitter Ritz)

Extras: Embossing Folder (Cuttlebug Heritage Collection), Glitter Magnet (Be Creative), glitter scoop (Doodlebug)

Pin It

Saturday, October 27, 2012

Stampendous October 2012 New Release Blog HOP!!!

Welcome to Stampendous October New Release Blog Hop!!!  We have a WHOLE bunch of Stampendous fun for you today!!

If you came here today from Tobi Crawford's blog, your in the right place!!!

I am sharing a card that I made for the Stampendous October 2012 catalog and of course, you can browse our catalog below by clicking on the cover (all of our catalogs as cool flippy books are on our website at the bottom of the home page, too).


Stampendous October 2012 Catalog

Feliz Cumpleanos means Happy Birthday!!


Stampendous has created some great sentiment stamps in Spanish for this release!!!  I am happy to be using Feliz Cumpleanos today!!!

Instructions:
Stamp background focal image and color with desired coloring medium. Stamp background stamp, color entire area with desired coloring medium.
Stamp sentiment and die cut with die cutting machine, add color to die cut while die is still in place. Stamp butterfly and cut out. Color as desired, add glitter.
Adhere sentiment panel and add flowers with pearl centers.
Apply glue pen to desired areas and add glitter.


Paper: Pink, Ivory Simply Smooth (Bazzill Basics Paper), Tiny Green Stripes(Little Yellow Bicycle)
Ink: Memento Rich Cocoa (Tsukineko), Distress Squeezed Lemonade Ink . Distress Victorian Velvet (Ranger)
Coloring Medium: Watercolor Pencils (Derwent)
Glitter: Multi-Crystal Ultra Fine Glitter (Stampendous)
Extras: Flowers, Pearls, Brads (Creative Impressions), Labels 4 Die Cut (Spellbinders)

Rush over to Wendy Price's blog for more Stampendous inspiration.  If you're just running across my blog today, here is the entire list of bloggers.  You can start from the beginning!!  Enjoy!!!


Wenday Jordan (You're Here)


Pin It

Thursday, October 25, 2012

Dreamweaver Stencils and Ranger Festively Distressed Video Tutorial


Welcome back to week two of our amazing collaboration between Ranger's Tim Holtz line of Distress Powders, and our beautiful Dreamweaver Stencils & Products! If you missed last week's event, start HERE.

Last week, we were totally blown away by the awesome response we received from those of you who hopped over from Tim Holtz's blog and the Ranger blog to check us out! We've been doing the "happy dance" ever since! Hopefully, you will continue to check us out, especially over the next few weeks as we continue our play-time in Tim's sandbox. (It is rather an appropriate metaphor considering the cool texture of his Distress Powders.)

Apparently, Tim and the wonderful people at Ranger were also excited by the response, and they've decided to "up the ante" in the form of an additional prize package(s) which will include TWELVE Distress Powders each, and a handful of Dreamweaver Stencils to go with! Wow! Just one teeny-tiny detail...to win one of these packages from their blog, you need to create something with Tim Holtz's Distress Powders and Dreamweaver Stencils and attach it to the inlinkz on the Ranger blog. Winners will be selected randomly. For more details, head over to the Ranger blog.

Once again, this week we are offering another fall prize package as shown here. Just leave us all some love as you visit, for an opportunity to be the one random winner we select. Curious as to who won from last week? It could be YOU! Visit the Dream It Up! blog for the announcement of the lucky commenter.


Here is what I had fun creating this week:


I had such a great time creating with my Ranger and Dreamweaver product, I MADE A VIDEO....


 Here is a close up of the Distress Embossing Powder Background.


Supplies Used:

Dreamweaver Stencils:
Ranger Distress Embossing Powders:
Stampendous


Aren't you excited to see what's next? Check out the Dream Team players for today:


You already know where to find Ranger's/Tim Holtz' products, but if you are having difficulty finding Dreamweaver, encourage your local stamp/paper-craft store to carry the line of fabulous stencil designs, pastes, and other products to mix with all of your stash of Tim's crafty goodness. You can also purchase our products on-line at Stencil with Style.

We'd love to see you come back regularly and play along with our monthly challenges (and more opportunities to win stencils) by linking your creations to the mr. linky on the Dream It Up! blog, or emailing pics of your creations to lynell@dreamweaverstencils.com. Since you're on the computer already, head on over and like us on Facebook as well. Just another location for dreamy and distressed inspiration!

Pin It

Wednesday, October 24, 2012

Stampendous October 2012 New Release Week!!!!

Good morning!!!

I can't take all the credit for the design of this card, but I can take credit for the coloring and the beautiful Stampendous image!

I was completely inspired by a pinner on Pinterest that used this card design and die cuts.  I simply added the new image from the Rose Thoughts Perfectly Clear Set by Stampendous.  You can start pre-orders fro this fabulous set on:

In trying to achieve the look of a white rose, I simply colored my rose with E81 and a bit of W0 and the Blender Pen.


We have more Design Team members with terrific samples to show you today, we hope you'll visit their blogs and leave comments...who knows..the circus might come to your town!!!


Wendy Jordan (You're Here)


And of course, you can browse our catalog below by clicking on the cover (all of our catalogs as cool flippy books are on our website at the bottom of the home page, too)

Stampendous October 2012 Catalog


Pin It

Monday, October 22, 2012

Stampendous New Release Week & A Birthday Surprise!!!


Two celebrations today!!!!  Susanna Boyd's Birthday Blog Hop and Day One of  Stampendous October 2012 New Release Week!!

Today I used an oldie but goodie technique for Release Week!  I stamped my new Stampendous Cling Hydrangea Bunch (CRW083) with Versamark Watermark Ink and lightly rubbed chalks over the ink to create a light background.   The sentiment is from Rose Thoughts Perfectly Clear Stamp Set (SSC1159).  You can find these stamps soon on the What's New section on the Stampendous site, 7 Kids College Fund and I {heart} papers.

To see more Stampendous New Product, take a look at these talented gals....


As you will read below, this is a Birthday Card for my friend,  Susanna Boyd!!   Please run over to Paper Craft Planet to wish her 

HAPPY BIRTHDAY SUSANNA!!!


Today, October 22nd, we are celebrating our PCP leader, Susanna Boyd's, birthday with a week-long Blog Hop celebration that every member on the Planet can participate in!

The Super Novas got together and each made a special birthday gift for Susanna's birthday.  In honor of this momentous occasion, we invite everyone to join in the hop and post a birthday greeting on each of their blogs for a chance to win some fun blog candy!  Extra points for commenting on the designers’ projects too!

So, join us for Susanna’s birthday party celebration from October 22nd that ends on October 28th.  Random winners will be announced on Monday, October 29th  on each designer’s blog.

HAPPY BIRTHDAY SUSANNA!

Wendy Jordan  (You're here!)


Supplies:
Cardstock: Bazzill Basics
Stamps: Cling Hydrangea Bunch CRW083, Rose Thoughts Perfectly Clear Stamp Set SSC1159 (Stampendous)
Ink: Versamark (Tsukineko(
Dies: Parsian Motifs (Spellbinders)
Ribbon: May Arts
Color Medium: Chalk


Pin It

Saturday, October 20, 2012

Stampendous Fabulous Florals Challenge!!


There is still 11 days in October to join Stampendous Fabulous Florals Challenge!!


Stampendous Jumbo Cling Amaryllis is a fabulous set to curb your WANT TO COLOR!!!

I created a Scrapbook Layout with the fabulous border stamp last week for our Core'dinations and Stampendous Blog Hop.  You can see the post HERE.

A challenge from Stampendous always means there is a prize in it for you!!!

Post your original creation via the link below!!!  Of course you don't have to use Stampendous, but we sure love it when you do!!!

We can't wait to see what you create!!


Pin It

Thursday, October 18, 2012

Dreamweaver Stencils and Ranger Industries...Exciting Collaberation


The Dream Team are so excited to have the opportunity to play along with some unique Ranger Productsin the Tim Holtz line...specifically, the Distressed Embossing Powders!  Our own Louise Healy demonstrated how fabulous these are with the Dreamweaver Stencils when she created this card for a fun class at CHA Summer 2012:


Apparently, Tim Holtz agreed with all of us on this unique use of his product, so he very generously had Ranger (thanks, Patti!) send the team some samples to play and blog with. So...here we go!

Here's my post for today:


Rolling Hills Stencil
Raven Stencil LL3015

I had a great time with my Ranger Distress Embossing Powders by Tim Holtz.  I used a similar technique to the Double Glitter Technique.  

  • Apply Dreamweaver Coconut Soap to the back of the stencil.  Once good coverage is achieved, turn the stencil over and brush excess soap out of the intricate edges.  **Remember, everywhere there is soap, there won't be embossing powder.  The purpose of applying the soap to the stencil is to act as a barrier between the stencil and the adhesive paper I am going to apply it too.
  • Remove protecting backing from Dreamweaver Double Sided Mounting Paper and lie sticky side of paper up.  Place soap side of the stencil onto the sticky paper and placing the protective backing, waxy side down and push the stencil onto the sticky paper ensuring that the stencil is secure to the sticky paper, you don't want your product to get stuck under the stencil.
  • Apply Ranger Distress Embossing powders by sprinkling on one color at a time and shaking off excess before adding another color.  The colors I used are: Brushed Corduroy, Peeled Paint, Spiced Marmalade and Scattered Straw
  • Once all colors are applied as desired, apply heat to the embossing powder with a heat tool and watch the powders melt.  Remove stencil when all powders are melted.
  • Apply glitter to areas that are not covered with embossing powders.
  • Using Tim Holtz Ideaology printed translucent tissue rolls, I laid the Raven stencil over the top of the tissue and added color with an applicator and a Black Soot Distress Ink.


For the next four weeks, on our regular Thursday posts, we will be featuring the wonderful things that you can do with Tim's Distress Powders and Dreamweaver Stencils. Leave comments on each of the team blog posts for opportunities to win one prize package for each of the four weeks:


Don't forget to play along with the Dream Team's monthly challenges for more opportunities to win some great stencil designs! October's challenge is Festively Fall, and November is CAS (clean and simple) Christmas! Link your creations on the Dream It Up! blog, or email pics tolynell@dreamweaverstencils.com. Join us on Facebook as well! Lots of inspiration, and lots of fun!


Pin It

Saturday, October 13, 2012

Stampendous - Core'dinations Saturday BLOG HOP!!!


Welcome to the Stampendous and Core'dinations Collaberations Week.  All week long the Core'dinations Team has been using Stampendous product and the Stampendous team has been using the amazing Core'dinations product!! 
To recap the week, check out each day's post...


Fall is a very exciting time around our home!!!  My husband and the kids are CRAZY for Big Game Hunting.   We have a trip that we take to Eastern Montana once a year with the girls, my Father, my Husband and I.  It is a great time being all together and hanging out in the mountains.


I started my page by stamping the awesome border that comes with the Jumbo Cling Amaryllis Set (CRS5036) with Garnet PearLustre Embossing Powder (psst...a must have for Christmas).
Jumbo Cling Amaryllis Stamp Set

Garnet PearLustre Embossing Powder

I also did a little Fran*taging to my background paper using Stampendous Aged Ochre Embossing Enamel, Aged Hunter Embossing Enamel, Aged Spice Embossing Enamel and Aged Scarlet Embossing Enamel.


I was provided with some beautiful Fall colors of cardstock by Core'dinations, I knew the colors would be perfect for leaves.   The colors of Color Core Cardstock are Victorian Velvet, Bundled Sage, Iced Mocha, Nostalgia and Tea Die.  Once I die cut the leaves, I sanded most of the color off.  I love how the veins of the leaves stayed true to color!!!


To finish my page, I die cut the frame for my picture and sanded to give a WONDERFUL distressed Fall look.

Around the edge of the background,  I added some fabulous Fall colors of Stampendous Color Fragments; Burgundy, Green, Caramel, Hunter Green and Ochre!!  

The title was stamped from the Stampendous Altered Type Alphabet Perfectly Clear Stamp Set.  The title "Only TWO more years" is how many years Kaylee has to wait before she can take Hunter's Safety courses and then she can hunt with her Big Sister.  If you can tell from the picture, she loves it and she looks pretty cute in all of her gear!

If you hopped here from Tenia's blog, you're in the right place.  To keep hopping along, head off to Wendy Price's blog, you know she will have something amazing for you!!!

Be sure to comment on all the blogs in the hop for your chance to win prizes from Stampendous and Core'dinations!!!


Wendy Jordan (You are here)


Pin It

Monday, October 8, 2012

Stampendous & Core'dinations Week!!!


Good morning!!  Welcome to Stampendous & Core'dinations Week!!!  Each member of our team post their amazing creations using Stampendous and Core'dinations this week, leading up to an amazingly inspiring Blog Hop Saturday, October 12th.

My card today was fun, colorful and rather simple to create.

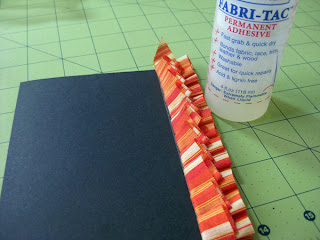
I started by cutting stripes of Core'dinations Black Magic Cut and Emboss Series Cardstock into .70" x 5.5" pieces.  I cut one strip of five different colors.   I loved this package of card stock.  There are 10 pieces of cardstock, 4 of each color!!!  What an awesome value.
They call this cardstock Black Magic because the front of each textured side of cardstock is black and the core of the paper is colored.  I chose to use, red, orange, yellow, green, light blue and a darker blue.

Once my strips were cut, I placed each in a "edge" embossing folder and dry embossed with a Big Shot.

My strips are now embossed and still looking like any other embossed paper, UNTIL I started sanding the embossed side of the cardstock with Core'dinations Sand It Set.  Not only is there a fabulous paper sander , there is a pick up cloth that works amazing for getting the sanding dust off of your project.


I layered the embossed and sanded cardstock on a piece of newsprint tissue paper and added a few swipes of Memento Ink.  I also added different colors of Memento Inks to my new Stampendous Cling Life is Art (CRY025) and stamped on white card stock.

I couldn't get enough of my May Arts ribbons, so I added the new May Arts Black Twill!!  I am in love with every color of this style of ribbon.  I added a little charm from my stash!!!

Supplies:
Cardstock: Black Magic (Core'dinations); white, tissue paper (Bazzill Basics)
Stamps: Cling Life is Art CRY025 (Stampendous)
Ink: Memento Bamboo Leaves, Lady Bug, Danube Blue, Summer Sky, Dandelion, Tangelo Ink (Tsukineko)
Embossing : Pop Culture Edge Embossing Folders (Provo Craft)
Ribbon: Black Twill (May Arts)
Extras: charms (stash)

I hope you will try some of this cool paper from Core'dinations.  For more inspiration from Stampendous and Core'dinations check out these gals....

Wendy Jordan  (You are here)

Be sure to leave comments on these blogs and the Stampendous blogs for your chance at winning a great prize from Stampendous and Core'dinations.

Pin It

Saturday, October 6, 2012

Stampendous, May Arts Blog Hop Collaberation!!!

Welcome to the HOP FINALE of Stampendous and May Arts Week!

I started my project today with black card stock, Orange Horizontal Striped Ribbon from May Arts and my sewing machine.   Stitching pleats into the ribbon was easy.  As I fed the ribbon through the machine, I folded the ribbon over and over.  This what I was left with.

I applied the amazing fabric glue Fabri-tac from Beacon to fold over my 1.5 inch ribbon to make a "puffier" pleat.


I stamped the new darling Stampendous Cling Scared Cat Kiddo with Tsukineko Memento Tuxedo Black and started coloring away with my Copic Sketch Markers.

Supplies:
Stamps: Cling Scared Cat Kiddo (Stampendous)
Paper: Bazzill Basics Paper
Ink: Copic Sketch Markers, Memento Tuxedo Black (Tsukineko)
Dies: Spellbinders
Ribbon & Twine: May Arts

Ready for some great Fall inspiration....


Wendy Jordan  ( You are Here)

Be sure to "hop" along and leave comments for the Hop participants today for your chance to win some fabulous May Arts & Stampendous goodies!!!


Pin It

Thursday, October 4, 2012

Dreamweaver Stencils Festive Fall Challenge

Good morning.

Welcome to another Thursday Dreamweaver Stenciling project and the introduction of a new challenge from Dreamweaver Stencils.

Today we are creating a Festive Fall Card using Dreamweaver Stencils Color Solutions Inks and Embossing Paste.


I paste embossed the tree stencil with Glossy White Embossing Paste, set it aside to dry (about 20 minutes).  In the mean time, I prepared my Color Solutions Inks and cleaned my stencil and dried it well.


I replaced the tree stencil over the dried paste and added a base of Citron Color Solutions Inks on the Glossy Paste.
*It is important to place the clean and dry stencil over the dried paste to protect your paper from getting ink on it.
When I had my base layer of ink applied, I dropped one or two drops of ink on my craft mat, picked it up with a Q-Tip and colored each "leaf" of the tree a different color  of ink.  The colors I chose were Citron, Darkest Brown, Paprika, Aspen Leaf and Pumpkin.  I also used Color Solutions Cleaner/Thinner for a few colors as well.


Here is a video I created using Dreamweaver Color Solutions Alcohol Inks with Embossing Paste.


My card base is the dry embossed Fall Trees Stencil (LJ849).  I placed my stencil on my card base and secured with a piece of removable tape.


The above photo shows the layering process for the Sizzix Big Shot.
I placed my stencil down on the base platform (Tab 1 and 2 removed), paper with a spritz of rubbing alcohol, Stamping Details Rubber mat, and two acrylic plates.  This sandwich works every time with the Big Shot and Vagabond.


Once the background was embossed, while the stencil was still in place, I spritzed Bright Copper Memory Mist onto the card stock.

This week I have a couple ways for you to win some FREE Dreamweaver Stencils.  You can play along with Dreamweaver Stencils monthly challenge, Festively Fall.  Link your creations to the Dream It Up Blog.

You can go to Paper Craft Planet,  read this post again and follow the instructions on how to win the stencil of your choice. 

Here is a quick recap of some cool ways to learn more about Dreamweaver Stencils....
  • Check out the Dream It Up Blog
  • "Like" them on Facebook
  • Get inspired by visiting the Dream Team's blogs on Thursdays
Here are links to the entire Dream Team's Blogs...

Happy Stenciling!!!


Pin It