Friday, November 15, 2013

Quietfire Design November Guest Designer

Happy Friday!!  


I love Susanne's designs from the Silhouette America store.  I think by now, I own them all!!!  The Christmas Tree Calligraphic image available at the Silhouette America Store is also an image from the Christmas is the Day set of nine stamps.


I used a dark card stock and I will explain why in a moment.
The settings I used on the machine were for plain card stock

  • Speed 3
  • Thickness 33
  • Blade 3


With a bit of spray adhesive on the back I placed my die cuts where I wanted them on my card stock.  I them colored the entire sheet with my Copic Air Brush system.  I used an array of greens until I achieved my desired color.


Desired color and airbrushing complete.


To finish the card panel I stated both sizes of trees from the Christmas is the Day set in between my masked trees.  The Merry Christmas is also from the same set.  I stamped and heat embossed on vellum and added a bit of brown ink to the vellum.


The reason I like to use dark card stock as masks is that I can add color over the top, as in this case, I cut black Christmas trees, was able to air brush over the entire top of them with multiple shades of green and I am still able to use them as black trees on a different card.  The sentiment is another Quietfire Design, Hold on to the Spirit of Christmas.

Thank you for joining me today!!  I hope you enjoyed this post!!
Happy Stamping and cutting!!

Pin It

Thursday, November 14, 2013

Dreamweaver Stencils Joins Beacon Adhesives for Holiday Celelbrations.


 This month Dreamweaver Stencils Dream Team has collaborated with Beacon Adhesives.

November's challenge is Holiday Celebrations!


  I stared with a new stencil, Vintage Decor LX7022, Gold Metallic Embossing Paste and Beacon Fast Finish.  I taped my stencil down and applied embossing paste.


Set this aside to dry until


it looks like this!!  It is pretty just as it is.


Next I stamped a background image on a piece of white tissue.  


I then placed the stamped tissue on the vase and applied Beacon Fast Finish over the top of the tissue with a paint brush.  I applied Fast Finish until the tissue paper was transparent.


Once dry, this was the result.

For more Dreamweaver Stencil and Beacon Adhesive inspirations, take a looky at these talented ladies….


Pin It

Thursday, November 7, 2013

Dreamweaver Stencils Holiday Celebrations with Ranger Distress Paints


Ready to be festively distressed once again? The Dream Team have been playing with Ranger's Distress Paints, and are ready to inspire you to be distressed as well...paint distressed that is! Dreamweaver Stencils are the perfect choice to mix with all things festively distressed, as nothing shows off color and texture better than great designs. By following our hop and leaving love along the way, you have the opportunity to win a great prize package including five Ranger Distress Paints and five Dreamweaver Stencils! Here's the lineup for today, including our November Guest Designer:


This is also our first posting day featuring our new monthly challenge, "Holiday Celebrations", and for the entire month we will be demonstrating ways to use Beacon Adhesives' entire line of products with Dreamweaver to create special projects in home decor and gifts of love. Here's mine:


I couldn't wait to try out the Ranger Distress Paint Mowed Grass!!!   This is my first time trying the paints, so I had to watch Tim's video to see what it could do!!

I liked the idea of wetting down the paint right away.  I used the cool sponge "dauber" and painted the front of a wooden 12 x 12 frame and sprayed it down with a ton a water.  The above photo is a picture of the paint wet .  I love how the water mixes with the paint!!!


After everything was dry, I had done a bit of stenciling with paste, once that was dry, I mixed Chipped Sapphire and Mowed Grass Distress Paint with Stickles Glitter.  Just so you know, mixing the two colors together and the glitter did nothing. 


In the above photo, the holly leaf is so glittery and sparkly because I added extra glitter to the top of the wet paint.

I also pulled out Beacon Gem Tac!  The only way to glue down gems!!


My finished project!  A few fun stencils added and a holiday frame with a tropical photo.


Supplies Used:

Paint: Ranger Distress Paint Mowed Grass, Chipped Sapphire
Glitter: Ranger Dry Stickles

Pin It

Wednesday, November 6, 2013

Quietfire Design November Guest Designer

I am so thrilled to be able to guest design for Quietfire Design this month!!!  

Quietfire Design has beautiful calligraphy word art stamps as well as GREAT cutting files and Silhouette America Cut files.


I started my project with the Snowflake Spray Card cut file that can be found in the Silhouette America cut file store.

The file is designed to cut a spray of snowflakes and the card base with a perforation for folding in one cut.  In my Silhouette software I had to do a few modifications to make the mask I was looking for to achieve my background.  Here are the steps I made…

  •  Ungrouped the image and removed the cut for the card base and the perforation
  •  I duplicated the image, flipped it vertically AND horizontally.  In the below photo, I also added a gray background so you could see what the cut file will look like on your screen. 
My end result  is a mask, so it is important the cut is exactly how I want to place it on my card base.


For this project, I cut removable, clear Contact Paper.


I cut a piece that would be fitting to the size of my project, placed it on the Silhouette cutting mat, with the paper protective backing down.   The contact material was face up on the mat.   My settings for cutting this type of material are:

  1. Speed #1
  2. Thickness #9
  3. Blade #2


With the above settings, I achieved a great cut, that didn't cut through the protective paper backing.  

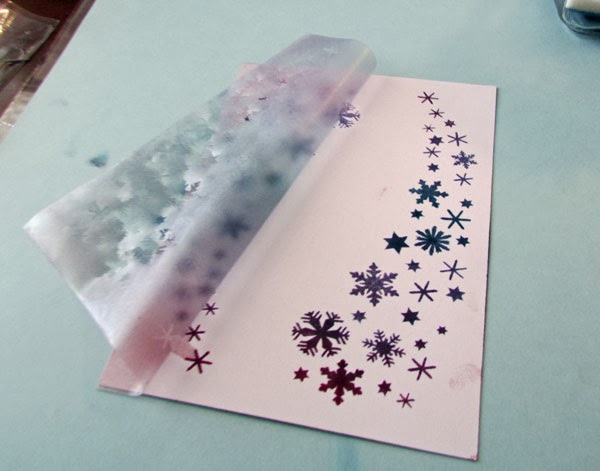
Once the design is cut, remove all of the extra pieces that are unneeded while the paper protective backing is still attached to the Contact Paper.  In this case, I removed all of the cut snowflakes, because I will be applying ink to those areas.  In the photo below is what the mask lookes like after I have removed all the extra snowflakes and removing the paper backing, but before applying it to my card stock.


You will now understand why it is important to be using removable Contact Paper.  Place your mask, sticky side down onto your card stock and trim around the edge of your card stock.  You will want to trim, so ink isn't applied where it isn't wanted.  Apply your ink, chalk, paint or the medium desired to the snowflake area.   Due to the sticky nature of the Contact Paper, you will see that ink is only where the snowflakes will be.  The mask isn't shifting, making unclear images.  Once the desired color and coverage has been achieved remove your contact paper.


THE PERFECT BACKGROUND!!!  I LOVE IT!!!


I was lucky enough to stamp two gorgeous images from a Quietfire Design new release, Christmas Is The Day, a great set of 9 stamps.  

The sentiment was stamped with embossing ink and heat embossed with Detail White EP from Stampendous, my fav!!!

The Flourished Holly Circle was stamped with Memento Rich Cocoa and I used Copic Sketch Markers to color the holly leaves.  (Copic Sketch G40, G43, G46).  The Flourished Holly Circle is accented with Spellbinders Parisian Motifs die cut.


The background, the decorative circle and sentiment were given an extra element of shimmer with Dreamweaver Stencils Iridescent Memory Mist.  The is the best shimmer spray in the market.  


Thanks for taking  peek at my Quietfire Design creation today!!  
See you in a few days for another fun design!!


Pin It