Thursday, August 22, 2013

Dreamweaver Stencils Christmas in August Continues


Good morning!!  Welcome to Dreamweaver Stencils Christmas in August Challenge.  The month is coming to close and just another week to enter your creation on the Dreamweaver Stencils Blog, Dream It Up.

For my set of cards I chose a technique that I saw at Winter CHA 2011,  using stencils with a cool product Stampee Foils.  There are a few ways you can create this technique, but because I am a "lazy" crafter, I chose too use as many Dreamweaver products as possible.   This translates into using Dreamweaver Stencils is EASY!!!


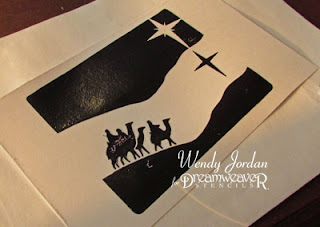
With stencil Wise Men, LL306, I "power pasted" four card panels with Glossy Black Embossing Paste by Dreamweaver Stencils.  Power Pasting is a term used for pasting more than one panel of card stock at a time.  This technique is achieved by securing your stencil to your protective table covering with removable tape and sliding your panel underneath it.  Secure the other three edges, paste your panel, lift your stencil, remove the panel, insert your next panel leaving the original piece of tape at the top.  Continue the steps until your stencil needs cleaning.  I have found that after four panels, the stencil need to be cleaned.  This is a great technique when your making more than one of a design.


Once the Glossy Black Embossing Paste dried, I cut enough Stampee Foil in Silver Mesh to the size of my background.  I placed the foil over the dried paste, placed in a folded piece of printer paper and inserted into a HOT laminator.  The pressure and the heat from the laminator secured the foil to the paste.  Once the piece is removed from the laminator, simply peel the foil from the design.

Stampee Foils also has a Bonding Powder that works as a glue for the foils.  The same design (minus the black paste) could also be achieved by dry embossing your design and while your stencil is still in place, apply embossing ink to the embossed area, sprinkle Bonding Powder over embossing ink,  heat with a heat tool and place foil where desired , insert into folded printer paper and place in HOT laminator, then peel the foil off of the design.


Stampee Foils are available in many silver "textures" and many metallic colors.  A fun product to use with dramatic results.


My simple set of four cards made in less than 30 minutes (minus paste drying time).

Supplies Used:
HOT LAMINATOR (Purple Cow)
Stencils: Wise Men, LL306 (Dreamweaver Stencils)
Embossing Paste: Glossy Black (Dreamweaver Stencils)
Foils: Silver Mesh (Stampee Foils)
Stamps: Tis the Season Perfectly Clear Set (Stampendous)

Take the time to check out what our team created this week to inspire you to join us in the Christmas in August challenge!!!


Thank you for stopping by and have a blessed day!!!


Pin It

Saturday, August 17, 2013

Dreamweaver Stencils & Woodware UK Christmas In August Blog Hop


Welcome to the annual Dreamweaver and Woodware Christmas in August extravaganza week! Monday through Saturday we will be knocking your Christmas stockings off with fun and inspirational ideas for the upcoming holidays. All that you need to do is hop back and forth across the "pond" on each day, oohing and aaahhhing as you go, and leaving us plenty of holiday love. In return, you'll be entered to randomly win one prize package for a UK commenter, and a second prize package for a US commenter, featuring products distributed in the UK by Woodware...including Dreamweaver and Stampendous!


Prize includes four stencils, one die, and two  stamps, selection may vary.


I love the look of embossed metal and with my card today I wasn't just able to get "the look",  I DID emboss metal with Dreamweaver Stencils and Mercart colored Aluminum.


Mercart has an extensive line of metal embossing tools, which I used a bit of, but to achieve the look quickly,  a die cutting machine works.  

I used  Dreamweaver Stencils new release, Joyeux Noel (LM2017) and one my favorites, Holly Swirls (LJ891).  I embossed the stencils with Mercart Red Aluminum Sheets and used Mercart Decorative Dash Wheel.  Cinnamon Stickles was used to separate the aluminum from the cardstock embossed background.  

Dreamweaver Stencils has darling Embellishment Pins which come in colors, but I only had the ivory pearl color.  To chance the color, I added Dreamweaver Stencils Color Solutions Ink Noble Fur to the pearls at the end of the pin to chance the color.  The inks are alcohol inks so the few drops I added to the pin covered the pearls and dried very quickly.  Color Solutions Inks are also artist grade colors which are not saturated until you add the Thinner.  The color on my pin is a deep, rich color and not diluted.  The perfect colored embellishment!!!

Now's the time for you to leave a comment and move on to an amazing stencil artists blog, Pam Hornschu.  If you're just joining the hop, please start from the beginning with the list below!!  You will want to check out all of the amazing Dreamweaver Stencil inspiration and comment to increase your chances of winning the prizes.


Thank you for joining us this week!!  I hope you've been inspired to get out your stencils or give stencils a try for the first time. 

For more inspiration, subscribe to the Dream It Up blog and join us each Thursday for more inspiring posts from the talented Dreamweaver Stencils Dream Team.

Dreamweaver Stencils is also on Facebook.  Another chance for more inspiration and an occasional giveaway!!!  We'd be honored for you to "like" us.

Pin It

Friday, August 16, 2013

Christmas In August...Dreamweaver Stencils and Woodware UK


Welcome to the annual Dreamweaver and Woodware Christmas in August extravaganza week! Monday through Saturday we will be knocking your Christmas stockings off with fun and inspirational ideas for the upcoming holidays. All that you need to do is hop back and forth across the "pond" on each day, oohing and aaahhhing as you go, and leaving us plenty of holiday love. In return, you'll be entered to randomly win one prize package for a UK commenter, and a second prize package for a US commenter, featuring products distributed in the UK by Woodware...including Dreamweaver and Stampendous!

Prize includes four stencils, one die, and two stamps, selection may vary.


Dreamweaver Stencils and Stampendous Stamps are a team made in crafty Heaven.   I was lucky enough to be given this darling stamp from Woodware UK by Stampendous, who has welcome House Mouse Designs to the Stampendous family.  The stamp is called Candy Joy.  I knew right away which stencil to pair it with!!  You can  view the entire collection of House Mouse designs here.

The background was simply created using  a re-release from Dreamweaver Stencils, Delicate Frame.  I paste embossed using Dreamweaver Silver Metallic Embossing Paste.    The metallic pastes, once dried offer a beautiful metallic shine that I love.  It really adds interest to your projects.

Candy Joy was colored using Copic Markers (see below for the list of markers used).


Now's the time for you to leave a comment and move on to the next designer for today, Louise Healy.

If your just joining the hop from my blog, you can start at the beginning from the list below!


Thank you for following Dreamweaver Stencils and Woodware UK's Christmas In August Blog Hop and be sure to leave your comments for your chance to win the fabulous prize.

See you tomorrow for a Hop featuring all the designers from all week long.

Copic Colors used for Candy Joy BG0000, G07, G12, E000, E51, E53, E55, E57, E81, E84, C00, C0, R00,  R11, R14, W1, W2, W3, W5, 0


Pin It