Showing posts with label Copic. Show all posts

Friday, August 16, 2013

Christmas In August...Dreamweaver Stencils and Woodware UK


Welcome to the annual Dreamweaver and Woodware Christmas in August extravaganza week! Monday through Saturday we will be knocking your Christmas stockings off with fun and inspirational ideas for the upcoming holidays. All that you need to do is hop back and forth across the "pond" on each day, oohing and aaahhhing as you go, and leaving us plenty of holiday love. In return, you'll be entered to randomly win one prize package for a UK commenter, and a second prize package for a US commenter, featuring products distributed in the UK by Woodware...including Dreamweaver and Stampendous!

Prize includes four stencils, one die, and two stamps, selection may vary.


Dreamweaver Stencils and Stampendous Stamps are a team made in crafty Heaven.   I was lucky enough to be given this darling stamp from Woodware UK by Stampendous, who has welcome House Mouse Designs to the Stampendous family.  The stamp is called Candy Joy.  I knew right away which stencil to pair it with!!  You can  view the entire collection of House Mouse designs here.

The background was simply created using  a re-release from Dreamweaver Stencils, Delicate Frame.  I paste embossed using Dreamweaver Silver Metallic Embossing Paste.    The metallic pastes, once dried offer a beautiful metallic shine that I love.  It really adds interest to your projects.

Candy Joy was colored using Copic Markers (see below for the list of markers used).


Now's the time for you to leave a comment and move on to the next designer for today, Louise Healy.

If your just joining the hop from my blog, you can start at the beginning from the list below!


Thank you for following Dreamweaver Stencils and Woodware UK's Christmas In August Blog Hop and be sure to leave your comments for your chance to win the fabulous prize.

See you tomorrow for a Hop featuring all the designers from all week long.

Copic Colors used for Candy Joy BG0000, G07, G12, E000, E51, E53, E55, E57, E81, E84, C00, C0, R00,  R11, R14, W1, W2, W3, W5, 0


Pin It

Friday, January 11, 2013

Stampendous January Kiddo Challenge

Good morning!!

The entire month of Janaury, Stampendous and I are celebrating KIDDO's!!!  What a happy day early last year when Stampendous introduced the kiddo line!!!  If you haven't take a look at all the cuteness...HERE YOU GO, follow this link.


I used the Cling Wagon Kiddo for this fun card that I used in as a class sample earlier this summer.  It is a great stamp to for students learning to color a scene.

The Stampendous’ Kiddos Collection of adorable children has really grown in 2012 and there are new additions to the family in store for 2013. These little kids are so cute and are doing those things kiddos all over the world love to do. They’re perfect for children’s birthday cards, party invites, scrapbook pages, and even a whole class full of Valentines! Our kiddos do it all. Let’s see what you can do with them! Stamp your favorite Stampendous Kiddos on any type of project and link it to the linky tool below for your chance to win a Kiddo of your own! (yes...you can use other cute kid stamps you already own, but Stampendous Kiddos on your project make it count twice!)(and yes, winners still need a U.S. Mailing address)


Pin It

Thursday, January 10, 2013

Dreamweaver Stencils January Fresh Start Challenge!

Welcome to Dream Team Thursday!!

Dreamweaver Stencils January Challenge is Fresh Start and you can use this challenge to express what a Fresh Start is too you.

Last week, in my Fresh Start challenge post, I posted a card design, that is a true Fresh Start with stenciling.  I dry embossed cardstock with a  stencil and a die cut machine.   In the post, I told you I was going to build on the challenge each week adding a new technique as the month progressed.

To read last week's post and see the Fresh Start creation, follow this link.

In last week's post, I showed how a simply embossed image can be so pretty.  This week, I am starting with the simple embossed image and sharing two easy ways to add color.


The supplies that I used to achieve the color's are Versafine Watermark Embossing Ink, Bare Trees (LJ849) Stencil, colored blending chalks.


I started by placing my clean, dry stencil over the top of the embossed image.  I secured the stencil and paper on all four sides with Removable tape.


 With the stencil in place, to protect the areas that I wouldn't like chalk, I applied Versamark Watermark Embossing Ink.  This ink will act as the"glue" that holds the chalk in place.

 I added each color with my fingertip as the applicator.  Be careful not to push to hard and your color will only stick where your Versamark Ink is.


Complete.  The design is still simple, just more to look at.

The next design is the same stencil, same dry embossing technique, just a different color application (and a reason to get that Copic Air Brush Machine off the shelf).


Choose a few colors from your Copic or whichever marker you can use in your airbrush.  The colors do not need to be in the same color family.  I chose B32, B47, B99.


Apply a layer of your lightest color all over the image.


 Jump to your darkest color and start at the bottom, where the sky would be darkest.  Continuing to add lighter colors as you work to the top of your panel.


Remove your stencil and you will find this!!  You can't see it in the picture, but this is where you will find that it is important your stencil is taped down on all four sides.  This particular stencil, at my own fault, is slightly bent in the center and while airbrushing, a bit of blue got underneath the stencil.    I still think the color gradient turned out stunning.


The Celebrate stencil was colored in the same way as the background.
I hope you enjoyed this easy way to add color to your embossed image. 

Next week, I  will continue my series with these two stencils and techniques associated with dry embossing.

Ready for more inspiration, please check out the rest of the Dream Team...

Cherylynn Moser
Cyndy Bundy
Georgia Sommers
Kristi Van Doren
Laura Drahozal
Lee Kellogg
Liz Martin
Lousie Healy
Lynell Harlow-Dream It Up
Pam Hornschu
Terrece Siddoway

Have a great DAY!!!

Supplies:
Stencils: Bare Trees (LJ849), Celebrate Script (LS90) Dreamweaver Stencils
Color Mediums: Copic Markers (Imagination International), Blending Chalk (Inkadinkado)
Ink: Versamark Watermark Ink (Tsukineko)
Extras: brads, ribbon (Creative Impressions)

Pin It

Saturday, October 20, 2012

Stampendous Fabulous Florals Challenge!!


There is still 11 days in October to join Stampendous Fabulous Florals Challenge!!


Stampendous Jumbo Cling Amaryllis is a fabulous set to curb your WANT TO COLOR!!!

I created a Scrapbook Layout with the fabulous border stamp last week for our Core'dinations and Stampendous Blog Hop.  You can see the post HERE.

A challenge from Stampendous always means there is a prize in it for you!!!

Post your original creation via the link below!!!  Of course you don't have to use Stampendous, but we sure love it when you do!!!

We can't wait to see what you create!!


Pin It

Saturday, October 6, 2012

Stampendous, May Arts Blog Hop Collaberation!!!

Welcome to the HOP FINALE of Stampendous and May Arts Week!

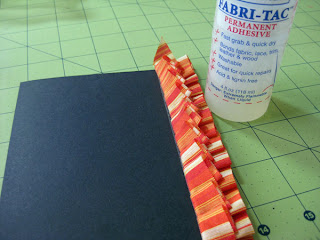
I started my project today with black card stock, Orange Horizontal Striped Ribbon from May Arts and my sewing machine.   Stitching pleats into the ribbon was easy.  As I fed the ribbon through the machine, I folded the ribbon over and over.  This what I was left with.

I applied the amazing fabric glue Fabri-tac from Beacon to fold over my 1.5 inch ribbon to make a "puffier" pleat.


I stamped the new darling Stampendous Cling Scared Cat Kiddo with Tsukineko Memento Tuxedo Black and started coloring away with my Copic Sketch Markers.

Supplies:
Stamps: Cling Scared Cat Kiddo (Stampendous)
Paper: Bazzill Basics Paper
Ink: Copic Sketch Markers, Memento Tuxedo Black (Tsukineko)
Dies: Spellbinders
Ribbon & Twine: May Arts

Ready for some great Fall inspiration....


Wendy Jordan  ( You are Here)

Be sure to "hop" along and leave comments for the Hop participants today for your chance to win some fabulous May Arts & Stampendous goodies!!!


Pin It

Saturday, July 28, 2012

Stampendous! NEW RELEASE Week Blog Hop!!!

Have you been following the Stampendous team this week as we showcased the new Stampendous Release?  Talk about knock your socks off amazing!!!  I am so proud to run in this crowd of talented ladies!!!  If you just came from Suzanne's blog, you're in the right place!!

I created this 3D Card using the new Cling Jumbo Amaryllis.


Instructions
Stamp focal image twice on white cardstock and color both images with preferred coloring medium. 
Cut flowers out from one of the images and set aside. Trim the second colored image to fit front of card panel. Cut coordinating card panel for focal image mat. Adhere mat, colored image onto card base.
Adhere the flowers that are cut out on top of the other colored flowers on card panel with a Glue Dot. Bend flower petals to for dimension. Apply Glossy Accents to flower petals for a glaze look.
Stamp border stamp from Cling Jumbo Amaryllis stamps set onto crepe ribbon with Olive Stazon. Place a strip of double sided tape onto card from and adhere ribbon to double sided tape. Apply pearls at the end of the ribbon and the center of the flowers. 


Supplies
Stamps: CRS5057 Cling Jumbo Amaryllis
Paper: Classic White Solar Crest (Neenah), Clay and Hilary (Bazzill Basics Paper)
Ink: Memento Tuxedo Black and Olive Green Stazon (Tsukineko), R000, R22, R24, Y000, G40, G43, G46 (Copic Sketch Markers)
Extras: Adhesive Pearls, 1.5” Crepe Ribbon (Creative Impressions), Glossy Accents (Ranger), double sided tape (Elizabeth Crafts Designs)


Thank you for taking the time to stop by today!!!


Taylor Usry (has additional blog candy)
Lea Kimmel (has additional blog candy)
Pam Hornschu (has additional blog candy)
Pin It

Wednesday, July 25, 2012

Stampendous July 2012 Release Week!!!!

Welcome to Day Three of our FABULOUS Stampendous Designer's showing off all of the fabulous new stamps that Stampendous just released in Chicago!!

Today I am going to share Stampendous! Cling Kiddo Hayride...


This was such a fun image to color!!  I spent so much time on perfecting the color of the straw, when in the end I covered it with the TWO new colors of Stampendous Color Fragments,  Carmel and Ochre.

I made my own straw (with the help of more Color Fragments for the road and my own grassy lane between the tires with Stampendous Green Glass Glitter.

Supplies: 
Paper: Bazzill
Stamps: Cling Kiddo Hayride (Stampendous)
Ink: Memento Tuxedo Black (Tsukineko), Copic Sketch Markers
Extras: Carmel, Ochre Color Fragments, Green Crushed Glass Glitter (Stampendous)


A few of my teammates are showing off new products from Stampendous as well! Not only do some of them have their own blog candy, Stampendous will be drawing a winner for this great prize pack.


How do you win it? It's easy! One of the featured bloggers today will be choosing a random commenter from her blog, and that lucky person will be announced on the Stampendous blog tomorrow. The more places you leave a comment, the better your chances are to win! Below is the list of team members who are sharing inspiration today:

Stampendous Impressions
Lynn Mercurio 
Cyndi Bundy
Susie Moore
Lea Kimmel
Wendy Price

Melinda Gleissner
Wendy Jordan


Pin It

Friday, July 20, 2012

Sweet 'N Sassy Stamps Christmas In July Digi Release

Welcome to Sweet 'N Sassy Stamps Christmas in July Digi Release and Blog Hop.  If you just came from Stephanie Wright's blog, your in the right place.  If you just so happened upon my blog today, start at the Sweet 'N Sassy Digi Challenge Blog to complete the Hop in it's entirety. 


This month Sweet 'N Sassy is really knocking your socks off with these fabulous must have images!!!

poinsettia-watermarked

immanuel-watermarked


and so many more!!!!


I chose to color the Sweet 'N Sassy Digi, Poinsettia.  I colored two and cut them both out.  The second image I only cut the flower out and added to the second image which had the beautiful leaves.

The Copic colors I used are R32, R35, R37, R39, G40, G43, G46.

Every card you enter throughout July, you will get one entry to be eligible for winning 3 digis of your choice from the Sweet 'n Sassy Stamps store. Be sure to play along every week. 

Every week, we spotlight one participant who uses SNSS digi images for their card or project.

One of the featured participants throughout July will also have a chance to be a Guest Designer for the month of September!

We strongly think those of you who love to use our digital images should be recognized a little more.
  Here is our Spotlight from last week's challenge (SNSDC62) - Fun Folds!

 Have you checked new Sweet 'N Sassy Stamps Digi Challenge FACEBOOK page? We will give away THREE digital stamps (3 winners, each gets 1 free digi of their choice) when we get to 100 LIKES!!

Now run off to see something amazing at Korin Sutherland's blog!!


Pin It

Thursday, May 3, 2012

Dreamweaver Stencils May Black & White Challenge

It's the very merry month of May now, and the Dreamweaver Stencils' Dream Team are playing with a new challenge, and we're hoping that YOU will play along! All of this month, we'll be creating for graduations and/or using black and white with a pop of color. May and June are typically the time for grads in the US, but to keep things even more interesting, you can choose to play with our colorway challenge instead.

Obviously, to play along with us, you do not have to have a complicated creation, so pull out your supplies and have some fun! Link your creation to the Dream It Up! blog, or email pics of your creation to Lynell@dreamweaverstencils.com. We love to post your submissions on the blog as well as the Facebook page. Even more, we love to provide you the opportunity to win one of two sets of two stencils by playing along. You have all of May to link as many creations as you'd like! Sorry...winners must be from the US or Canada.

Today, I am posting a video tutorial using Dreamweaver Stencils with Copic Markers.

Dreamweaver-Copic-Coloring


I hope you enjoy the tutorial. 

You can win a FREE stencil by visiting the Paper Craft Planet Blog and leave a comment on this tutorial!!

Good luck!!

Are you ready for more Dreamweaver Stencil inspiration??

Check out these talented gals…

Cherylynn Moser

Cyndy Bundy

Georgia Sommers

Jessie Hurley

Kristi Van Doren

Laura Drahozal

Liz Martin

Lee Kellogg

Louise Healy

Lynell Harlow – Dream It Up

Pam Hornschu

Terrece Siddoway

See you next week!!!

Thursday, April 26, 2012

Dreamweaver Stencils ~ Bring May Flowers April Challenge


Welcome to our last week of Dreamweaver Stencils April Challenge, Bring May Flowers. 

Dreamweaver-41912

I have been having such fun coloring my Dreamweaver Stencils White Glossy Paste with Copic Markers.  First I paste embossed LL548 Daisies with Glossy White Embossing Paste.  Once the paste dried, I colored over the paste with Copic Alcohol ink markers.

We would love for your to play along with our challenge at Dream It Up.  Link your creation to the Linky tool!  I can’t wait to see your fabulous creations!!

Check out our fabulous Design Team for some inspiration…

Dream It Up – Lynell Harlow

Jessie Hurley

Pam Hornschu

Cyndi Bundy

Kristi Van Doren

Laura Drahozal

Lee Kellogg

Georgia Sommers

Liz Martin

Cherylynn Moser

Louise Healy

Terrece Siddoway

Have a great day!!!

Thursday, December 22, 2011

Merry Christmas from Dreamweaver Stencils

Merry Christmas!!

Just a few more days until Christmas!! 

I have a super quick and easy card to share with you this morning.

Our Dream Team Color Challenge this week is Burgundy and Gold! 

Dreamweaver122211

I have been super busy with the holiday season and I needed to make this one last card in a lurch, so I spritzed Bright Gold Memory Mist onto Burgundy cardstock and placed the Merry Christmas stencil (LL386) over the top of the mist.  I pasted with Metallic Gold Embossing Paste and set aside to dry.  When the gold paste was wet, it was a nice goldy, opaque color, when it was dry, it had dried a beautiful gold color, but not quite the color I needed for this project.  When dry, the Gold Memory Mist and the Gold Metallic paste were almost the same color and hard to see.  To solve the problem, I colored over the Metallic Paste with Copic Sketch marker R59.  I love the result.  The color of the sentiment is beautiful in person.

I hope you have a very Merry Holiday Season!!

Friday, December 9, 2011

Friday Copic Post

Hi there!!

Today I wanted to share a few more cards that I colored!  The first two cards are made with Wee Stamps by Sylvia Zett for I Brake For Stamps.

Love at first site when I saw this collection.  I have MANY more of her her stamps on my Christmas list!!!

Copic-Syliva-Zett

This card was made with the stamp Let It Snow.  I colored her up and layered her on a card base with the SEI Collection Silver Valley Patterned Paper.  A bit of lace on the sides…I like it!!!  The sentiment is from my favorite Verve Holiday Set Glad Tidings.

Supplies:

Paper: Mohawk White (Kelly Paper Co.); Silver Valley Collection (SEI); Bazzill

Stamps: Let It Snow (Wee Stamps for I Brake for Stamps); Glad Tidings (Verve)

Ink: Memento Tuxedo Black(Tsukineko); N1, N3, N4, C0, C1, C5, R000, R01, BG0000, Y00, BOO0, BOO, E000, E00, E11, E25, E31, E50 (Copic Sketch)

Lace: craft supply stash, Liquid Pearls (Ranger)

Dies: Classic Circle, Lacey Circle (Spellbinders)

Copic-Sylvia-Zett1

Another cute Wee Stamps image called Winter Fairy.

This is simply colored and placed on a card base with some neat corner flourishes by Heartfelt Creations.

Supplies:

Paper: Mohawk White (Kelly Paper Co.); purple, pink (Bazzill)

Stamps: Winter Fairy (Wee Stamps for I Brake For Stamps)

Ink: Memento Tuxedo Black (Tsukineko); E50, E31, 325, YG63, YG67, R59, C1, B12, B14, YR68, BV000, BV01, BV02, N1, N3, N4, RV02, E000, E00, E11 (Copic Sketch Marker)

Extras: ribbon (craft supply); Classic Oval Die (Spellbinders); Corner Flourish (Heartfelt Creations); liquid pearls (Ranger)

Stampendous-COPIC-Peony

This last creation is a card sample for a class that I am instructing in January.  It is a Fundamentals of Copic Class.  Each student will get three markers in the class and they will make two cards.  This is an image using mostly three markers and in areas, four.  This is a retired Cling Jumbo Peony stamp from Stampendous.  It is a shame that this image is retired, but you may be able to still find it at a local store or Michaels.  Stampendous has a huge line of Jumbo Cling stamps that can be colored with Copics, embossing powder, acrylic paint.  Pretty much whatever your heart desires.

If you’re interested in taking the above class, please send me an email or comment in this post with your contact information.

Supplies:

Paper: Mohawk White (Kelly Paper Co.)

Stamp: Cling Jumbo Peony (Stampendous)

Ink: Memento Tuxedo Black (Tsukineko); RV00, RV21,RV23, RV25 (Copic Sketch)

Thank you for stopping by and taking a peek today!!

Have a great weekend!!

See you tomorrow for this month’s Color Challenge post with the Stampendous team!!!

Wednesday, December 7, 2011

iCopic Black Hair Challenge


Life is crazy busy for me right now and Lord knows that I don’t have time to participate at challenge blogs, but I have been struggling with coloring black hair with my markers for some time. iCopic has a great inspirational video on coloring black hair, so I decided to throw my name in the hat for the Black Hair Challenge at iCopic.


I feel the need to tell you all the issues I find wrong with my black hair, but I think I will leave you to the critiquing.

Here is the entire easel card, opened.

I am so in love with this stamp from the Whimsy Stamp Wee Collection. I picked it up from my good friend Della at I Brake For Stamps!!

Please take the time to play along over at iCopic!! This challenge really challenged me!! Loved it!!

Supplies:

Paper: Mohawk Bright White (Kelly Paper Co.); trio of blue (Bazzill Basics)

Stamps: Life Is Good (Verve); Silver Fairy (Whimsy Stamps)

Ink: Memento Tuxedo Black, Versafine Black Onyx (Tsukineko), C1, C2, C3, C5, C6, C7, C9, E000, E00, E11, E40, E42, E43, BOOO, BOO, B02, B04 (Copic Sketch Markers) glitter pen (Copic Spika)

Extras: Silver Halo Glitter (Stampendous), ric rak, seam binding (etsy), border punch (MS)

Thanks for taking a peek today!! I hope you have time to join in the challenge!

Enjoy your day!

Photobucket