Friday, September 28, 2012

Holiday Card Boot Camp #1 - Lewistown Art Center - Lewistown, Montana

Today I am headed to Lewistown, Montana to teach the first of four Holiday Card Boot Camp.

Holiday Card Boot Camp is a three to four hour class, making simple card designs that you can recreate in a timely fashion to WOW your family and friends with Handmade Holiday Cards.  The class will make three each,  of five designs.

To sign up, follow the link to Lewistown Art Center for details.

Here are the cards that we will be creating in the Boot Camp...


Stamps by Stampendous:  Cling Snowman Wreath CRP171


Stamps by Stampendous: Snow Globe Kiddo SSC1148


You will be find future Holiday Card Boot Camps at:

Memory Lane Scrapbooking
Missoula, Montana

The Memory Trail
Helena, Montana

Memories On Main
Fort Benton, Montana

I hope you can find the time to take the coarse at one of these locations!!


Have a great weekend!!!


Pin It

Paper Craft Planet Friday Sketch Challenge

Good morning! Today I am presenting the  Paper Craft Planet's Sketch Challenge for this week!! 

This sketch offers many liberties of card dimensions!!  Use this sketch as you see it!!


 I chose a traditional A2 sized card!!


 I look forward to seeing what you can come up with this week!!


 Supplies: Paper: Bazzill Basics Paper
 Stamps: Cling Pumpkinstein CRV223, Cling Mumkin CRH280 and Cling Autumn Words CRR149 (Stampendous)
 Ink: Versamark Watermark Ink (Tsukineko)
 Extras: Aged Green Embossing Enamel (Stampendous), colored pencils (Prismacolor), ribbon (May Arts), Cantalope Perfect Pearls (Ranger)  


Pin It

Thursday, September 27, 2012

Dreamweaver Stencil September "Get Inky" Challenge


It's Thursday already and that means Dreamweaver Stencils Dream Team Challenge Post.  This month our challenge is Get Inky.  Getting Inky ANY WAY YOU can think of!!

This week, I grabbed my Copic Markers and my Airbrush System.


The stencils I chose this week:


LJ922 - Christmas Borders

LG674-Oval Ornament


LL554 - Nativity


I placed my Oval Ornament stencil over a 6 x 6 piece of canvas and covered the area's that I didn't want to airbrush with a sticky note.  I airbrushed B52 (Copic Sketch) in the background of the ornament.  With the Oval Ornament still in place, put the Nativity stencil over the top of the oval ornament.  Mask the area that you don't want airbrushed.

With all area's masked, I started airbrushing the bottom of the Nativity Stencil with the darkest of the gray that I chose, C9 (Copic Sketch).  As I moved "up" the stencil with color, the grays got lighter with C6 and C3 (Copic Sketch).


I airbrushed a bit of Y04 around the edges of ornament.

The background is a dry embossed Christmas Borders,  on ivory card stock.  With the stencil still in place over the dry embossed card stock, add ink as desired.  I applied Weathered Wood and Old Paper Distress Ink.  Before I removed the stencil, I spritzed Iridescent Memory Mist over the embossed ink area.

This month we will again choose two winners. One for best interpretation of the challenge and one for best usage of Dreamweaver Stencil products. And the prize will be any Dreamweaver Stencil of your choosing.

Upload your creation to the Link Tool at Dream It Up, Dreamweaver Stencils Blog.

 Now please take the time to see what the rest of the team has been up to:


Pam Hornschu
Laura Drahozal
Cherylynn Moser
Louise Healy
Wendy Jordan  (you're here!!)
Cyndi Bundy
Terrece Siddoway
Kristi Van Doren
Georgia Sommers
Lee Kellogg
Liz Martin


Pin It

Saturday, September 22, 2012

Fall into Fall with Flair and Zva Creative


Good morning!! Today I am posting for Paper Craft Planet and Zva Creative Fall into Fall with Flair!!


The Paper Craft Planet Super Nova's have been given the opportunity to create fabulousness with wonderful Zva Creative products.

I recently bought a new home and I am already dreaming of my holiday decorating so I chose to "bling" up an old vase that I have had for years.


Stamping on glass with Stampendous Cling Jumbo stamps is cool and very simple to achieve. I applied Versamark Watermark onto the beautiful scroll included in the Cling Jumbo Dahlia Stamp set by Stampendous.


 Without using an acrylic stamp blog, I placed the stamp on the glass and pushed down by placing my fingers on the back of the stamp.  However, Versamark is slipperier on glass than it is on paper, so be careful not to push to hard, or the stamp with smear, BUT if is does, don't panic, wipe the Versamark off with a damp cloth, dry the area and start over.

I stamped and embossed around the bottom of the vase and added Aged Bronze Embossing Enamel to each image.  Once I sprinkled the enamels to the vase, I heat set if with my heat tool.


Zva Creative was really thinking when they decided to adhere their beautiful flourishes to acetate in the packaging.  It makes the process of WHERE to adhere the flourish easy.  I love being able to see exactly where I will be placing my bling!!


I love how this turned out.  I really wanted to be able to take a picture of my Thanksgiving table for this post, with my "new"  vase, but like I said before, I recently moved and all of my holiday decor has been placed in a pile in the garage.  Ugh.

I know that my table decor will knock the socks off of my guests...when the time comes.


 I was loving my Zva Creative bling and having such a ball, I decided to create a card as well.

 Lisa Somerville is hosting The Planet's Sketch Challenge this week, so I decided to create a card using her sketch, Zva Creative bling, Canvas Corp Handmade Paper and Stampendous stamps and Embossing Tinsel.


 I created a card base of kraft colored paper and stamped the Cling Queen Crown (CRP113) from Stampendous with Versafine Vintage Sepia ink onto the background.  With  a Versamark Pen, I added embossing ink to a few areas on the crown, sprinkled Vintage Mahogany Embossing Powder and heat set. I cut my Handmade Paper from Canvas Corp to the desired size with a mat, adhered over the stamped background of the card base.  I stamped my sentiment, Cling Cherish Family (CRQ164), added a bit of color around the edge with Distress Ink and adhered it to the card base.  Last but not least, I added a smaller Zva Creative flourish to the base.


  Zva Creative produces many beautiful color groupings of high quality pearls, flowers and crystal embellishments that can be used on scrapbooking, card making and mixed media projects. Visit Zva’s gallery or blog for great project ideas and to find a list of stores and online retailers that sell Zva click HERE. Want to win some Zva Creative  goodies of your own?  You can win the product featured here by leaving a comment on this post and we will pick one lucky winner at the end of the week.


Pin It

Thursday, September 20, 2012

Dreamweaver Stencils "Get Inky" September Challenge

Welcome to Dreamweaver Stencils Dream Team Thursday!!!

This month the Dream Team is "Getting Inky" with our stencils!!!  Yep, any kind of ink, sprays, ink pads, markers, you name it, we are using it.

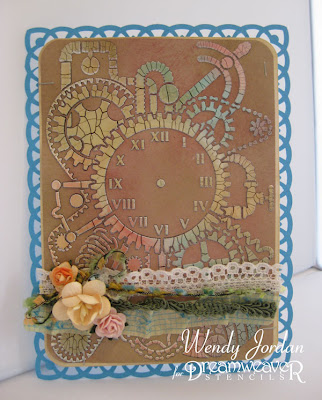
 I used a new stencil released in July from Dreamweaver Stencils called Steampunk Clock (LX7018).  I started by paste embossing the stencil first with Matte Black Embossing Paste and once that was dry ,replacing the clean, dry stencil over the dry paste and applying Crackle Paste over the top.


When the Crackle Paste was dry, I added layers of Distress Inks with a application tool.  The Crackle Paste dries white so the added color takes to it very well.  Again, I placed the clean, dry stencil over the dry paste and applied color over the top of the stencil, so only the embossed area would receive the color.

I recently bought a fun item at a local fiber artist at my local scrapbook store, The Scrapbook Hideaway.


The natural fibers are hand died.   I think they are just neat.
I was finally able to use them on a project I felt worthy of using them on!!
Here is a closer look...


The dimensions of my card are 4.75 x 5.75, so I can mail this in a 5 x 7 padded envelope.
Dreamweaver Stencils new LX stencils have revolutionized the size cards I create.


This month we will again choose two winners. One for best interpretation of the challenge and one for best usage of Dreamweaver Stencil products. And the prize will be any Dreamweaver Stencil of your choosing.

 Now please take the time to see what the rest of the team has been up to:


Pam Hornschu
Laura Drahozal
Cherylynn Moser
Louise Healy
Wendy Jordan  (you're here!!)
Cyndi Bundy
Terrece Siddoway
Kristi Van Doren
Georgia Sommers
Lee Kellogg
Liz Martin


Supplies:
Paper: kraft, white (Neenah), turquoise (Bazzill)
Stencil: Steampunk Clock (Dreamweaver Stencils)
Pastes: Matte Black, Crackle (Dreamweaver Stencils)
Inks: Fired Brick, Scattered Straw, Broken China, Walnut Stain Distress Inks (Ranger)
Fibers: local craft supply; Flowers: Wild Orchid; paper tape (Bazzill Basics)


Pin It

Wednesday, September 19, 2012

Stampendous September Embossing Challenge!!


Happy Fall!!!  

Today I want to share a card I created by embossing on acetate.


I started by cutting my card base to 5.5 x 4.25 (A2 card) and a rectangle from the center with a die cut.  I cut a piece of acetate, just a bit bigger than the rectangle from the card base.  

On my craft mat, I placed a few drops of Color Solutions Alcohol Ink by Dreamweaver Stencils on my craft mat and laid my acetate in the ink and swirled it around.  The colors of ink I used were Lemoncello, Cosmo Pink, Pearl White, Mojito Green and Color Solutions Cleaner/Thinner.   I added more color where needed.  Once satisfied, I stamped the new Stampendous Follow Art stamp (CRH289) onto the (non-inked side) acetate with Versamark Watermark Ink, sprinkled Aged Black Embossing Enamel over the image and applied heat.  The enamel melted into a black image with shimmery gold flecks.

I rotated direction and ink colors around the border with the Stampendous Cling Scrolled Medallion (CRV268).

I would love if you played along.  Use the link tool at the bottom of this post to link your embossed creation to the Stampendous Challenge.  

We also have prizes....
Our prizes this month are, not surprisingly, some of our Exclusive Fran•táge Embossing Enamels. How about our newest colors??! We’ll choose three winners to receive some super hot Essentials.


Pin It

Saturday, September 15, 2012

Stampendous Handmade Christmas Blog Hop!!!

This week the Stampendous team has been sharing their Handmade Christmas Gifts made with Stampendous stamps!!!

I posted a cool re purposed tea tin on Monday and today I am sharing a group of cards I created.  The new Holiday stamps released this past July are awesome.  I hope your inspired by them....


Ink: Memento Tuxedo Black (Tsukineko), Copic Sketch Markers
Glitter: Medium Silver Halo Glitter (Stampendous)


Stamps: Cling Special Delivery CRM269 (Stampendous)
Ink: Memento Tuxedo Black (Tsukineko), Copic Sketch Markers
Border: Silhouette Cameo


Stamps: Cling Snowy Postcard CRR143 (Stampendous)
Ink: Memento Tuxedo Black (Tsukineko), Copic Sketch Markers
Glitter: Cool Highlights Glitter Ritz (Elizabeth Crafts Designs)

Are you ready for some real Holiday eye candy?  Here ya go!!
Wendy Jordan (You are here!!)
AND don't forget our Saturday Challenge continues - We're sharing embossing techniques all month! Here's what we've been working on (most recent inspiration first):


Be sure to leave comments along the way, no hop is complete with out prizes from Stampendous!!!
Have a great weekend!


Pin It